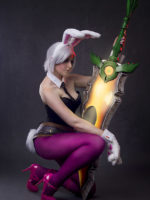
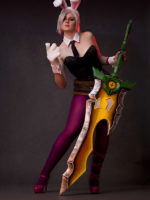
Battle Bunny Riven from League of Legends
Photos by Matt Barnes
Model, costume: Sylvie Kirkman
The ears have a base of worbla scrap, mounted to a plastic headband with long nails to provide support. These are covered in a sleeve of white fur with a pink inner stitched in place, with a fleece spacer to add padding. The base band is covered in fur, with a cotton stay stitched to the underside to finish.
The suit was modified from Yaya Han’s pattern McCalls M7398. I found the shaping on this pattern really good after a bit of tailoring, my only major modifications are the center front panel and the height of the legs. I found that I couldn’t make the original center front work with the seam shaped as it was (which may just be a lack of experience on my part) but straightening this seam made things much easier for me. Note that if you do this, you will end up with an excess of fabric in the crotch; you need to remove this to have it sit properly.
One thing I love about this pattern is the fit around the butt – because the center back seam is curved, it cups your cheeks really nicely and it is super flattering. I actually tried straightening this seam as well to keep it in line with suit patterns I found online, but when I pinned out the excess to fit I ended up right back where I started.
Sizing on the pattern runs large, like every other commercial pattern I’ve ever used – I measured at a size 16, and cut this just to be safe, but I had to tailor down closer to a 12. This is my preference anyway to be honest, I like having the extra material to be able to get a really good fit.
I initially lengthened the pattern by about 3″, but this turned out to be way too much – I ended up taking it out agin in the first toile. My recommendation is to cut your first toile as per the pattern (with the exception of the center front panel), mod the leg holes and crotch, plus any major size adjustments you want to make now, and try it on. You’ll definitely be wanting to adjust further from there, but this method has worked for everyone I’ve helped fit their suit so far (five different people plus my own) to get a pretty accurate idea of what adjustments to make next.
The paw is made with white faux fur, with finger and palm pads stitched in place over a fleece spacer to add padding and depth. This is cut very large, and has a lining in white cotton that is a closer fit to my actual hand. The cuff has a support layer of worbla to keep it rigid, and this is caught into a facing stitched to the upper edge of the fur glove and covered with a white cuff to match my other hand. The cufflinks were bought on AliExpress.
The belt is shaped to fit across my hips, and is a base of dark brown faux leather with a lighter trim at upper and lower edges. Large brass eyelets were added for detail, and the entire thing was weathered with acrylic paint. The carrot accent is eva foam covered in worbla and smoothed out with Polyfilla, sanded and sealed and with the leaves added in black worbla. These are held in place with glue and a metal rod to reinforce the join. Both this and the sword were basecoated in Montana Black paints, with texture and detailing added by hand in acrylic. This was clearcoated and is held in place on the garment with vinyl straps stitched to the base belt.
The sword blade is a base of insulation foam, cut to shape and beveled along the blade edge. There’s a length of wooden dowel embedded in the blade for strength, and the battery cavity is a piece of PVC pipe running into the blade with contacts wired at each end. LED strip lighting runs along the inner edge of the blade, and this is powered by 4x C batteries and a 12v boost regulator. The hilt unscrews for the batteries to be inserted or removed, and unfortunately is a major stress point – I had difficulty finding the right couplings for the pipe and as a result this join is very weak.
The blade was covered with worbla once shaping and wiring was complete, and was smoothed with a very large amount of Polyfilla – unfortunately I was very slack in getting the initial shaping right, so a significant amount of cleanup was needed. The hilt is a base of PVC pipe with cardboard “fins” and worbla used to create the faceted shaping on the shaft; the pommel is 3 layers of MDF cut to shape and layered over one another, with worbla detailing added to create the rounded edges. This is inserted into the base of the hilt and screwed into place, with the round detailing added over the join. Again cleanup was done in Polyfilla and sanded smooth.
The sword was painted with Montana Black sprays for the basecoat, with detailing added by hand.
Most of the accessories for this costume (collar, cuffs, tail) were made with pattern pieces included in Yaya’s pattern and all were very easy to construct and wear. The tie is held in place with snaps under the collar, and the tail is fixed to the belt with hooks and eyes; it can be removed for transport or for use with other costumes. I highly recommend using long fur for tails, it looks great – a little more realistic (though I use that term very loosely) than shorter fur. It is expensive, but a short cut of fur is enough for several tails, so it’s a good item for splitting the cost across several people.
Notes
This costume was made as a joke, which very quickly got out of hand! The suit was a challenge, but nowhere near as much as the sword. I’m very pleased with the results, but because I was making this on a deadline I rushed the planning which was a big mistake. The join at the hilt is a huge design flaw on my part, and it means the whole prop is very delicate – won’t be doing that again.


